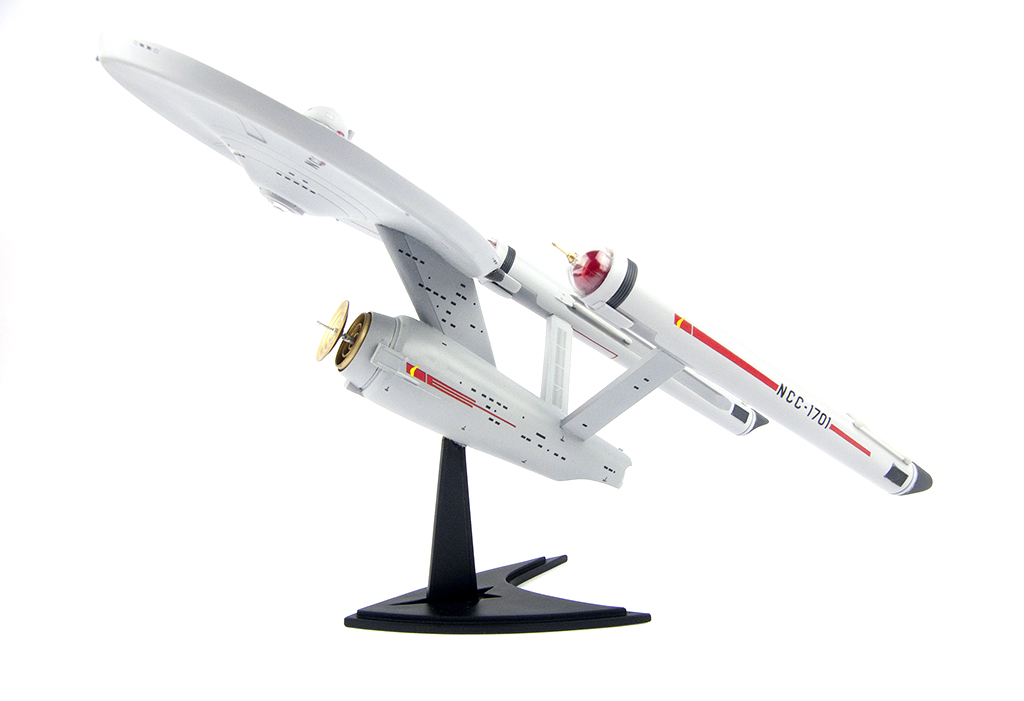
Posted on Leave a comment

Building the Hasegawa P-51D in 1/32 Scale: Part 2

In Part 1, we got as far as test-fitting the finished Grand Phoenix resin cockpit into the fuselage, with some pretty nasty gaps to be addressed at some point. There are a few other tasks that need to be done prior to joining the fuselage, however, and I’ll need to attend to those first.

One of the issues that plagues a lot of older Mustang kits (in all scales), is the nasty seam line on this exit ramp (I’m not sure what it is, actually) underneath the fuselage:

The common way to fix this is to cut it out and replace it with a single piece of styrene sheet, which is what I’ll be doing:

I also created a small set of shelves out of styrene strip for the new panel to rest on, and will be installing it once the fuselage halves are joined:

My next challenge was dealing with the tail wheel. Hasegawa would have you trap the part inside the fuselage at this stage, and I really can’t stand that approach, so I tried to engineer a solution that would allow me to install the tail wheel at the end. My first approach was a bust, but I eventually settled on gluing a segment of styrene tubing to one of the mounting points in the fuselage:

The attachment lug for the tail wheel, moulded into the starboard fuselage half. I destroyed the one on the port side during my first attempt to solve this problem!

The next step was to modify the tail wheel to suit this new approach, which entailed removing the cross beam meant to seat into the kit mounting points:

I had to drill out the styrene tubing slightly to get a nice fit, but I have no doubt this will work out fine, as long as the tubing holds.

In the end, I had concerns about the overall strength of the tubing’s bond to the fuselage, so later on I added another section to replace the kit lug I destroyed. This should brace against the inside of the fuselage on that side, and provide extra strength and stability. I hope!

The white-on-white is a bit difficult to see, but there’s now a new section of tubing on the port side of the upright piece.

Prior to that, however, there’s still a bit of work to do before I can join the fuselage together, so I started working on the radiator intake and outlet parts. I found among the box of aftermarket products a small, nondescript sheet of photo-etch parts, and it took me ages to work out that it was from the Dragon P-51 kit. It contained some seat belts and a pair of grilles for the radiator duct, so I set about adapting the latter to fit the Hasegawa parts:

And the finished radiator air exit ramp:

The ramp panel was airbrush with Tamiya AS-12, decanted from the spray can. The radiator face was airbrush with Tamiya XF-85 Rubber Black, and then dry-brushed with Mr. Color MC-218 Aluminium. It’s not perfect, but perfectly in keeping with the goals of this build, and certainly much better than what Hasegawa gives you in the box!

I also fitted the kit firewall, mainly in the hopes that it would help support the engine (I don’t think it will), but also to generally stabilise this area of the fuselage when the two halves are joined:

This of course leads to the engine itself. Even though I intend to build this model all closed up (with the possible exception of the sliding canopy), I figured I would need to assemble and install the engine, as it’s required to hold the propeller in place. So I assembled the basic components, trimmed away the mounts for the kit exhausts, and butt-joined the exquisite Moskit units with flexible black CA (AK’s Black Widow product):

The Moskit exhausts are absolutely exquisite, and terrifyingly fragile! Check out those openings…

I wasn’t done the engine yet, however, as test-fitting showed that there was absolutely no positive points of location for the completed assembly with the fuselage itself; it seems that it’s meant to simply hang off the exhaust stacks and prop shaft. I suspect the kit exhaust parts are meant to assist with these, but since I wasn’t using them, it seemed I would have a difficult time locating the engine properly and closing the fuselage around it. After mulling it over for a while, I came up with a solution:

Basically, I found some aluminium tubing that matched the diameter of the prop shaft (2mm OD – I would have preferred brass for strength, but didn’t have any in this size), snipped off the kit part, drilled suitable holes front and back, inserted the tubing right down the guts, and then trimmed it to length. It’s secured with brushable CA at each end. I also drilled a hole into the tank (oil?) in front of the firewall, to accept the tubing out of the rear of the engine, and support that end:

And here’s the obligatory test fit:

It’s still pretty loose in there, and will still require the prop assembly to lock it in place properly. But at least the rear end is taken care of, and it should make joining the fuselage halves much less ambiguous.

But we’ll have to wait until Part 3 to see how I get on with that.

Stay tuned!

Posted on Leave a comment

Building the Hasegawa P-51D in 1/32 Scale: Part 1

The venerable Hasegawa 1/32 scale P-51D Mustang has been around since since the 1970s, first hitting the streets in 1972. At the time, it represented the state of the art in injection-moulded plastic kit production. Now of course, it has been eclipsed in all regards, and effectively been made redundant by vastly superior renditions of the P-51D in 1/32 scale.

Nevertheless, after narrowly surviving a major house move, I needed what I thought would be a relatively quick and simple project to instigate my return to the workbench after a long absence. I chose this kit thinking it would fit the bill, and because it also qualified for the The Mighty Eighth Over Europe Group Build on Large Scale Planes. It was also gifted to me by a friend who had long since lost interest in the hobby, and I felt his generosity deserved to be repaid with an actual build of the kit.

As it happens, some years earlier, another friend had sent me his started example of the same kit, himself having abandoned it in favour of the then-new Tamiya release. He was part-way through scratch-building a new cockpit, and had made improvements to numerous other parts. More relevant for my build, however, was the inclusion in the box of a handy selection of aftermarket products, including Moskit exhausts, Grand Phoenix resin cockpit, True Details wheels, and some Eduard photo-etch sets.

So, with an unstarted kit in one hand, and a box full of useful upgrades in the other, I was off to the races!

As is the usual practise, I started with the cockpit, which meant removing the moulded-in detail from the kit fuselage sidewalls, to make room for the resin parts:

My friend had already done some clean-up and minor assembly work with the cockpit components, and unfortunately the seat had become broken at some point:

I tried in vain to glue the two parts back together as is, but in the end, it was easier to cut away the broken areas, and replace them with a single piece of styrene sheet and copious amounts of black CA glue (super glue):

The cockpit tub itself is a single-piece affair, with separate sidewall pieces. My friend had already started adding some additional details to the batteries, but since I was planning to keep this build as simple as possible, I decided against adding anything more.

The instrument panel supplied with the resin set comprises resin, photo-etched, and acetate parts:

The photo-etched component of the instrument panel. Also found on the PE fret are the rudder pedals.
This pre-printed acetate sheet contains the instrument dials, and forms the ‘meat’ in the sandwich between the resin and photo-etched parts. Here, the rear side has been painted white to bring out the otherwise transparent dial detail.

The first order of business was to lay some primer down on the resin parts, ready to accept the final paint coats. I normally use Mr. Surfacer for this job, but I’ve had some of this specialised resin primer from Mr. Hobby lying around for quite some time, and decided to give it a whirl:

I thinned it 50:50 with Mr. Color Levelling Thinner, and splashed it onto the resin components with my trusty Iwata HP-C Plus:

Cockpit sidewalls and instrument panel column.
The mended seat in primer, with the joins happily all but invisible.

Using Mr. Hobby H-58 Interior Green, in combination with some Vallejo colours for detail painting, we arrive quite quickly at a decent-looking set of cockpit components:

The instrument panel turned out especially well, I thought. The yellow line is pieced together from 4 sections of appropriately-coloured decal.

The various cockpit placards came from the Eduard pre-coloured photo-etch set (32 515). I applied some acrylic washes, some light dry-brushing, and a bit of chipping on the seat using a Prismacolor silver pencil. Done! Please don’t quote anything I’ve done for accuracy, however, as my goal here was to simply make it look busy and colourful, though not too far from the truth.

I decided to add a section of styrene strip to each side of the fuselage to aid with locating and supporting the cockpit:

I then gave selected areas of fuselage a coat of Interior Green, and test-fitted the now-finished cockpit:

Hmm, some decent gaps at the sidewalls there! But we’ll have to wait for Part 2 to see how I get on with those.

Stay tuned!

Posted on Leave a comment

Deadpool!

Whenever I find myself in a bit of a modelling funk, and for whatever reason I can’t seem to drag myself to the workbench, I often find it helpful to just grab a kit that’s outside my comfort zone or usual area of interest, and put it together without worrying too much about accuracy or detail. I call this having a modelling holiday, and as often as not I turn to sci-fi subjects for the answer.

Recently I found myself once again in need of such a modelling holiday, and reached into the stash for the Diamond Select Toys 1/8 scale Deadpool figure. It’s a snap-together kit that’s more of a toy than a sophisticated model, but looks the part when completed.

It was certainly good to be back at the workbench again, but now I think it’s time to build some more aircraft!

Posted on Leave a comment

Halcyon 1/9 Alien Figure

Having recently released our newest title (Building the Revell He 219A-7 in 1/32 Scale), I thought I’d take some time out and do some model building of my own! I chose to finish off Halcyon’s 1/9 Alien figure, which comes with a diorama base and alien egg (the ones that squirt nasty little facehuggers at you!). I’d started this build mid-way through 2018, but put it aside due to some uncertainty around how to make the base more interesting. Since 2018 was all work and no play for me, I resolved to be more productive at the workbench in 2019, and dragged this one off the shelf of doom and set about finishing it off.

It’s Not Easy Being Green

The initial colour layer for the diorama base was simply Mr. Finishing Surfacer 1500 Black, straight out of the rattle can (the Alien figure received the same treatment). This was followed by a light dusting of clear flat, ready for the next stages.

The solution for making the otherwise all-black diorama base look more interesting turned out to be a smattering of washes and dry-brushing using various shades of green—the most effective of which was U.S. Interior Green (Gunze H58, to be exact).

Heavy streaking and dry-brushing with shades of green, followed by a heavy coat of clear gloss, produced a suitably slimy result.

To finish off the egg, I applied some clear UV-curing gel to the opening, which created a nice sense of slimy ooze, and helped enhance the organic effect I was aiming for.

Don’t stare for too long!

The Alien figure received the same base coat of Mr. Finishing Surfacer 1500 Black. The highlights were worked in by dry-brushing some Mr. Metal Color Dark Iron, along with some detail work with a 2B graphite pencil. This was followed by a heavy wash of dirty black/brown, achieved by mixing Flory Models Dark Dirt with Black.

I’m pretty happy with the final result, even though this type of modelling is way out of my comfort zone!

We’ve already released one sci-fi title as a free download (Building the Revell X-Wing in 1/48 Scale), so perhaps we should do some more!