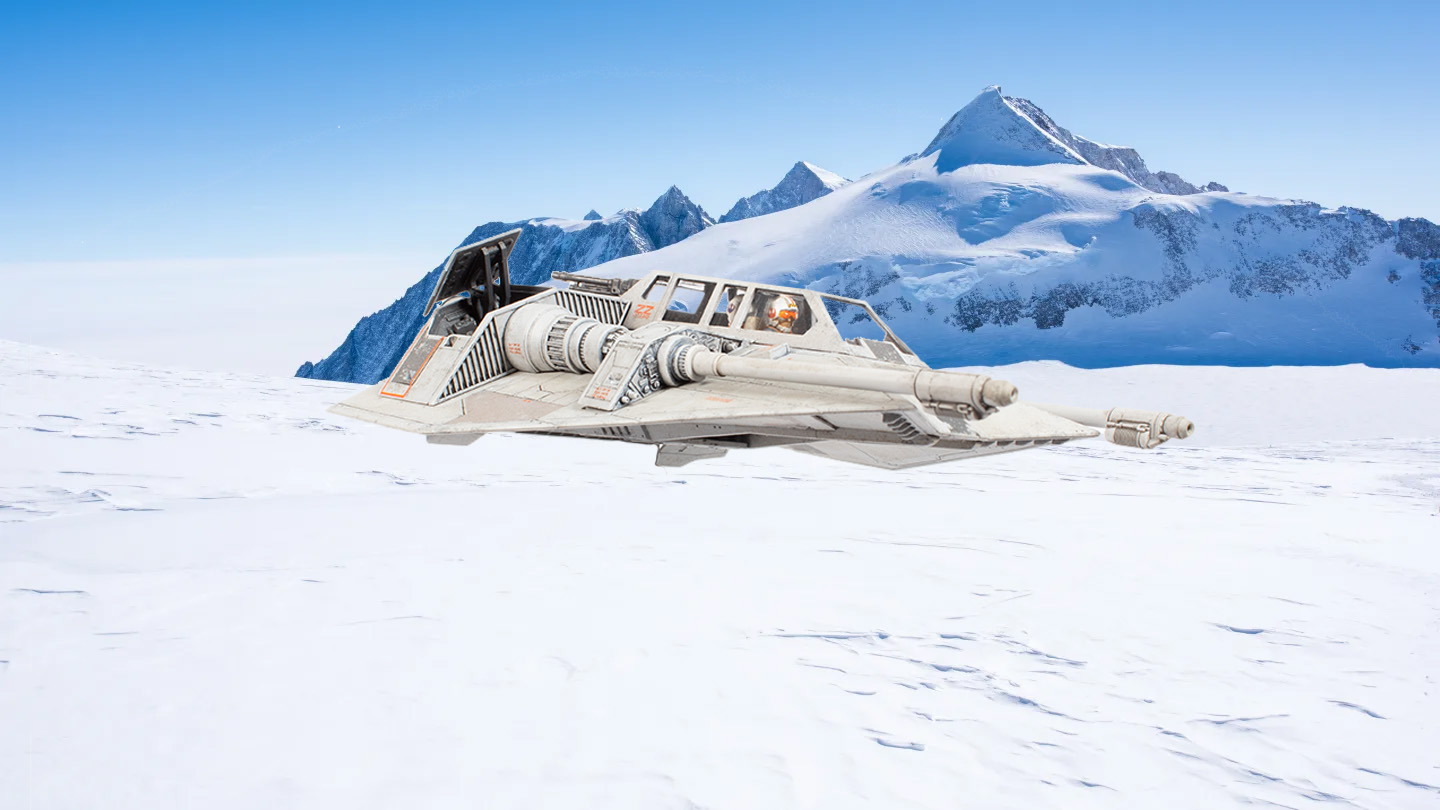
Inspired by some other examples I’d seen online, I decided to have a go at filming a quick 360° video of my recently-completed Bandai Snowspeeder build. Turns out my old Hobby Tools (Trumpeter) motorised display turntable was kaput, which forced me to purchase a replacement. I wanted something bigger and better anyway, but after a frustrating few hours of reading (mostly negative) reviews, I managed to find just one on Amazon that seemed to fit the bill. Once duly purchased and delivered, I decided to, well, take it for a spin.
Not good! Garbage, in fact. I quickly determined that the main issue seemed to be that the base of the turntable didn’t sit flat on the table, but instead had quite a significant wobble. After taking a bastard file to two of the four moulded-in plastic feet, I was able to rectify the problem, but unfortunately it made no difference to the level of jitteriness exhibited by the Snowspeeder. It seems there’s just too much instability in the stand, exacerbated by the angle I set it at. I need to do some follow-up testing with other types of models, but I suspect anything with spindly undercarriage will produce similar results. My guess is most cars, AFVs, and figures would be fine.
So, disappointed but not defeated, I shall retreat to the hobby room for some more tinkering.
This video—a relative failure though it is—also represents a soft launch of the KLP Publishing YouTube channel. Even though there’s not a lot happening just yet, it would be fantastic—and much appreciated—if you could give it a “like and subscribe”, as they say. I’m also happy to take any suggestions for content you’d like to see.
And don’t forget to subscribe to our blog for future news and updates!
I took this project on as part of my friend Scott Taylor’s #smschallenge2 on The Scale Modeller’s Supply Facebook group. Scott is the proprietor of The Scale Modellers Supply (SMS), purveyor of the fantastic SMS paints range, among other useful modelling tools and supplies. The challenge was to build a Star Wars kit—any Star Wars kit, and kicked off, appropriately enough, on May the Fourth.
Here’s the kit in question:
If you’ve never seen one of these Bandai Star Wars kits in the flesh, you’re in for a treat the first time that you do. They’re really quite amazing, and can literally be built without any glue. The level of detail, quality of moulding, and overall execution of the package is second to none. There are three runners of light grey plastic, one in black, one in translucent red, and a runner for the clear parts that has been stunningly moulded with the black runner!
Despite being essentially a “snap-together” kit, it features some amazing detail and engineering.
Markings are provided as either standard waterslide decals, or child-friendly self-adhesive stickers.
The instructions are in Japanese for the most part, but an English translation is available.
Getting to first base with this kit is a doddle, though there are traps for the unwary—I did manage to screw up the orientation of a couple of parts, however, which is pretty true to form for me!
Note that I raced ahead and glued the rear cockpit cowl in place too early, which would later cause me a bit of an issue!
One of the more challenging aspects of the build is painting the nicely detailed cockpit. If you’re not feeling up to it, decals (and stickers) are included in the kit to provide console details, but I of course chose the hard way!
I used MRP RLM 66 (MRP-59) as a scale black for the base colour, followed by careful brush painting with various Vallejo Model Color acrylics.
The cockpit side consoles were a real challenge to paint, but turned out OK I think. Thankfully, washes and dry-brushing help enormously!
The cockpit seats were painted with Tamiya Deck Tan, and given a heavy wash with Burnt Umber oil paint.
After painting all those small details, I realised I needed better detailing brushes!
The rear cockpit console. Some of the smallest details were actually painted with a toothpick.
The front cockpit console (left) and rear cockpit screen (right). The latter was first painted silver (Mr. Metal Color MC218 Aluminium), followed by a couple of heavy coats of Tamiya X-23 Clear Blue.
While I had the detail brushes out, I also painted the interior of these equipment bays on what I presume are cannon mounts:
MRP RLM 66 for the base colour, and Vallejo acrylics for the details.
Such is the beautiful simplicity of this kit, that once the cockpit was fully painted, the main fuselage (hull?) parts could be assembled:
The rear cockpit hood being clamped back into position after emergency removal!
Of course, this is where my too-early installation of the rear cockpit hood came back to haunt me, as it blocked the rear console assembly from being slid into place! I ended up having to saw the hood off with a razor saw, insert the rear console assembly, reattach the hood (seen clamped after gluing in the photo above), and then blend in the join with Mr. Surfacer 500. Even Bandai kits aren’t safe from my ham fists!
With careful painting, the cockpit really comes to life.
I took a lot of my cues for this build from a 3-part video series by Jon Bius on YouTube, and he suggests leaving the rear section off the model until the very end, whereas Bandai would have you enclose it between the fuselage halves while joining them.
I had a bit of trouble getting it fully inserted properly at the end, so I’m not sure if I would do it that way again.
Another tip I got from Jon’s build is to use the 2-piece canopy solution (rather than the 2-piece all clear alternative), mask the inner clear piece, and then assemble them temporarily for painting and weathering:
Here are all the major assemblies after a couple of light coats of Mr. Finishing Surfacer 1500:
I added little tabs from Tamiya tape to the equipment bay covers, so I could use them a masks while painting, but easily pull them off when I was done.
The black areas were painted first with Tamiya Rubber Black. I decided to keep the Mr. Surfacer as the base colour, as it’s pretty close to what I was aiming for anyway, and will make a good base for the subsequent weathering. I also decided to try the kit decals for all the panel variations, rather than mask and paint them.
Kit decals being applied over a coat of Tamiya X-22 Clear Gloss.
I elected to use the kit panel decals, rather than mask and paint them, just to see how they would work out.
While the kit decals were OK, I’d definitely mask and paint them next time. For starters, the printing is surprisingly coarse, with the dot pattern quite visible close up. They’re also quite thick, and I had to deal with some residual tenting issues around raised details. And the last issue, one of my own making, is that I misplaced some of the underside panels, creating gaps and misalignments along the way. I decided not to apply two of them at all in the end, as there was no way they were going down over the raised details in those areas (I did try with one of them).
Now I could start in on the weathering, which started with a panel line wash.
This was actually the second attempt at the panel line wash, as my first attempt with oils (my usual approach) all but wiped right off completely during clean up. I had to fall back to some AK Interactive Panel Liner, and even then, it’s still pretty patchy. Ultimately I deepened some of the panel lines around the nose that weren’t holding on to the wash, and reapplied it with more success.
While I waited for those initial weathering passes to dry off, I decided to start painting the two pilot figures, base-coating with Fire Orange from the new Infinite Colour range from SMS:
This was followed by a heavy wash of Burnt Umber oil paint, and then a couple of hours of detail painting and decalling, to arrive at the result below:
Putting the ‘pain’ back into painting. The cockpit figures don’t look great in close up, but at normal viewing distances, they seem to do the job.
And back to the final phases of the weathering process, rendered mostly with filters of oil paint and some chipping with acrylics:
The cannon assemblies just click into place, but I chose to glue them down for a better overall fit.
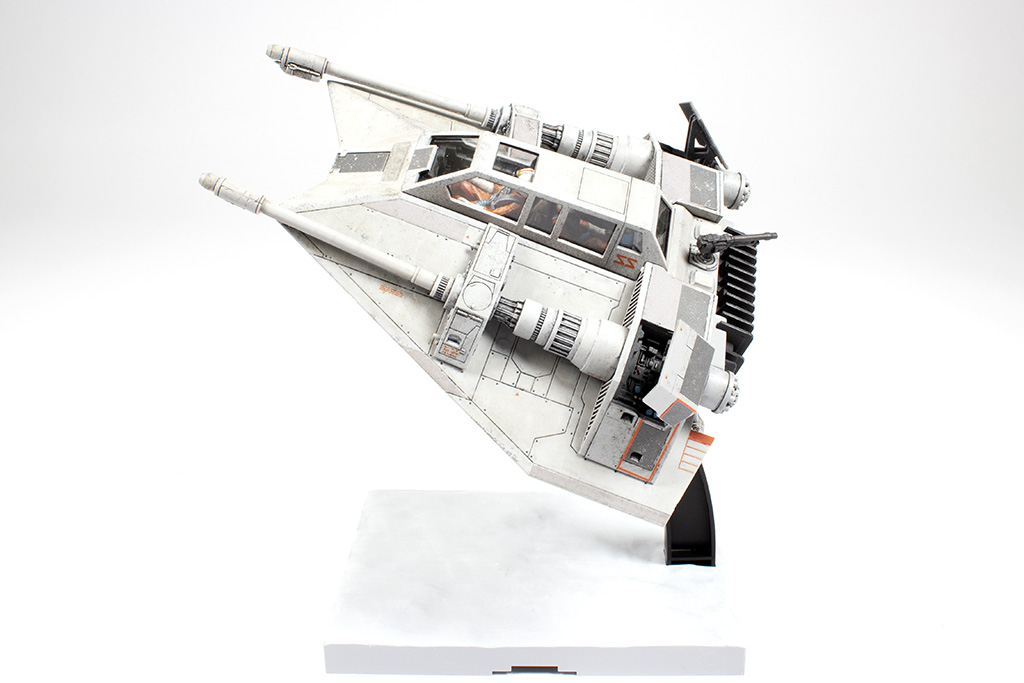
With the weathering complete, final assembly could begin. I elected to use the kit’s display stand for simplicity’s sake, so it was painted up in off-white and black, ready for duty:
Time to install the crew figures:
The final tasks were to paint the inside of the plastic canopy part, along with the rear gun, and then assemble and install both. The gun was painted with RLM 66, given a flat coat, and I mounted the finished model on the display stand at a suitably dynamic angle.
I enjoyed this build tremendously, and am already struggling to resist the urge to crack open another Bandai Star Wars kit immediately! If you haven’t built one, I recommend you do so, and as soon as possible!


You must be logged in to post a comment.