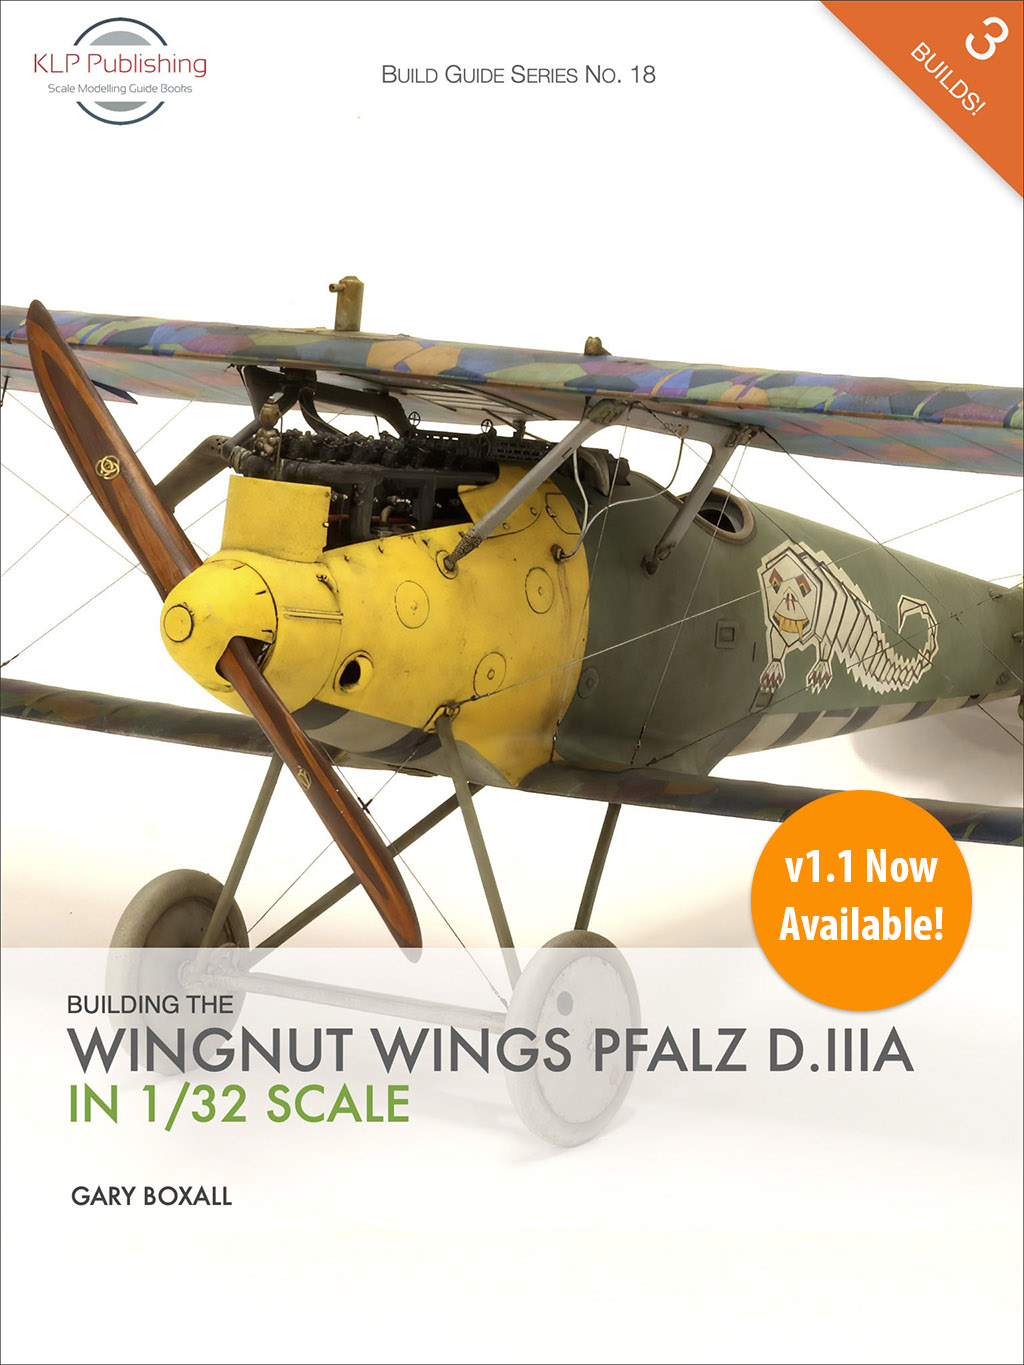
The sixth title in our Build Guide Series, Building the Zoukei-Mura Ki-45 Kai Tei in 1/32 Scale, turns 2 today, and to celebrate, we’ve reduced its price by 33% to just 8 Australian dollars for the next 5 days.
In this 97-page eBook, noted modeller and KLP author Jan Gabauer takes you through the building, painting, and finishing of the terrific 1/32 scale Ki-45 Kai Tei kit from Zoukei-Mura. Jan navigates the complexities of the build with aplomb, offering tips for overcoming the particular challenges of this kit. The process is very instructive, and results are quite spectacular!
v1.2 Now Available!
“Just purchased. What a wealth of information! Thank you so much! Worth every penny! The model looks exquisite!“ – Dennis Karpenka, USA
“Great book and mega props to Jan on his build!! Love it!” – Derek Brown, USA
“This is the type of publication that the new digital format is made for. If you want a book for a specific build having a digital publication saves you space on your bookshelves. This is clearly a book written by modellers for modellers. The text is clear and concise and the great selection of crisp pictures is welcome, many more than you would get in a printed publication. Highly recommended.” – Julien Dixon, Britmodeller Review
So jump on over to our webstore and grab yourself a bargain!
Building the Zoukei-Mura Ki-45 Kai Tei in 1/32 Scale
In this 104-page eBook, noted modeller and KLP author Jan Gabauer takes you through the building, painting, and finishing of the terrific 1/32 scale Ki-45 Kai Tei kit from Zoukei-Mura. Jan navigates the complexities of the build with aplomb, offering tips for overcoming the particular challenges of this kit. The process is very instructive, and results are quite spectacular!
I’m pleased to report that our next title, Building the British Phantoms Vol. 1 by Geoff Coughlin, has reached first draft, and will be ready soon. The book is currently 368 pages, and features six kit builds, 20 colour profiles by Simon Hull, chapters on the Evolution and Key Features of the FG.1, and a 62-page Walkaround of FG.1 XT864.
Revell/Hasegawa 1/48 FG.1 Phantom II XV571 ‘A’ No.43 Squadron, RAF by Nick Turner
A final round of proofing and polishing should see the book ready for release some time in the next few days, so stay tuned for an official announcement!
I’m pleased to announce that our next title will be Building the British Phantoms Volume One: The FG.1 Phantom II in Royal Navy, Fleet Air Arm, and A&AEE Service, by renowned UK modeller Geoff Coughlin. As the title implies, this is the first of a three-volume series, with Volume Two covering the FGR.2, and Volume Three focussing on the F-4J(UK) variant.
Volume One will also be the first in our new Modeller’s Monograph Series, and will feature six kit builds, 20 colour profiles, an extensive walkaround of FG.1 XT864, and chapters on the evolution of the British Phantom and key features of the FG.1 Phantom II.
FG.1 XV571 Phantom, Revell 1/48 by Nick Turner
Stay tuned for more news and information regarding this release as development progresses. Together, these three volumes promise to be the definitive one-stop go-to for anyone interesting in modelling the British Phantom.
“…this is what a model book should be like in this format…” – John Svendsen, Australia
“…it’s excellent. Not only a great how to, but a lot of back story of the Aussy Sabre and the pilot. That said, the real good part is the customer service.” – Chuck Cook, USA
“This is a book written by modeller for modeller and it shows. The text is clear and concise and the pictures crisp. The additional history and words from the pilot really do add to the story of the aircraft. Highly recommended.” – Julien Dixon, Britmodeller review
Building Brick’s Sabre in 1/32 Scale
Written by master modeller Eric Galliers, this 123-page digital book shows you how he built his award-winning 1/32 scale model of K.J. “Brick” Bricknell’s CAC Sabre. Using the Italeri 1/32 scale F-86F kit as a basis, Eric modifies it to the Avon-powered configuration employed by CAC-built RAAF Sabres, to produce an exquisite replica of Brick’s Sabre as he flew it in 1963.
The fifth title in our Build Guide Series, Building the Fly Arado Ar 234 in 1/32 Scale, turns two today. To celebrate, for the next four days, we’ve reduced the price by a massive 33% to just 10 Australian dollars!
In this 156-page eBook, Kent Karlsen builds not one, but two examples of the Fly Arado 234 kit in 1/32 scale.
The feature build sees Kent take kit 32008, add a ton of scratch-built detail, and then construct an amazing airfield maintenance diorama, in a scene that might have occurred at ‘Fliegerhorst Grove’ air base, in post-surrender Denmark.
For his second build, Kent converts kit 32003 into the V6 four-engine prototype, complete with figures and a Sd.Kfz.2 Kettenkrad from Zoukei-Mura.
Building the Fly Arado Ar 234 in 1/32 Scale
In this 164-page eBook, Kent Karlsen builds not one, but two examples of the Fly Arado 234 kit in 1/32 scale.
The feature build sees Kent take kit 32008, add a ton of scratch-built detail, and then construct an amazing airfield maintenance diorama, in a scene that might have occurred at ‘Fliegerhorst Grove’ air base, in post-surrender Denmark.
For his second build, Kent converts kit 32003 into the V6 four-engine prototype, complete with figures and a Sd.Kfz.2 Kettenkrad from Zoukei-Mura.
No. 2 in our Build Guide Series, Building the HpH Fw 189 ‘Uhu’ in 1/32 Scale turns four today, and to celebrate we’ve temporarily reduced the price to just 5 Australian dollars!
In this 74-page eBook, Jan Gabauer tackles the impressive mixed-media 1/32 scale Fw 189 kit from HpH Models. Jan navigates the complexities of the build with aplomb, offering tips for working with resin assemblies, and overcoming the particular challenges of this kit.
Building the HpH Fw 189 ‘Uhu’ in 1/32 Scale
In this 74-page eBook, Jan Gabauer tackles the impressive mixed-media 1/32 scale Fw 189 kit from HpH Models. Jan navigates the complexities of the build with aplomb, offering tips for working with resin assemblies, and overcoming the particular challenges of this kit.
Building the Kitty Hawk HH-60G Pave Hawk in 1/35 Scale
In this 186-page eBook, Pete Fleischmann takes the Kitty Hawk 1/35 scale HH-60G Pave Hawk kit, and combines it with aftermarket parts, resin figures, and some scratch-building, to produce an outstanding airborne rescue vignette, complete with a wounded Afghan solider being winched aboard. Pete takes you through the build process step-by-step, with plenty of useful tips on painting and detailing the model. There’s also a separate 24-page section in the book where he shows you how he produced the figures.
Pete’s build is highly instructive, and will be invaluable to anybody wishing to build the Kitty Hawk Pave Hawk. It’s available from our web store for just 15 Australian dollars.
Building the Kitty Hawk HH-60G Pave Hawk in 1/35 Scale
In this 186-page eBook, Pete Fleischmann takes the Kitty Hawk 1/35 scale HH-60G Pave Hawk kit, and combines it with aftermarket parts, resin figures, and some scratch-building, to produce an outstanding airborne rescue vignette, complete with a wounded Afghan solider being winched aboard. Pete takes you through the build process step-by-step, with plenty of useful tips on painting and detailing the model. There’s also a separate 24-page section in the book where he shows you how he produced the figures.
And as with all our books, should any updates be required, anyone who purchased a prior version gets lifetime free access to all subsequent updated versions! All new purchasers will of course receive the updated version automatically.
Our massive tome on building large scale sci-fi & fantasy models, entitled Building Large Scale Sci-Fi & Fantasy Models oddly enough, turns one tomorrow, so we thought we’d celebrate with a nice 25% discount for the next three days!
In this 473-page eBook, Jason Gares (renowned author, modeller, and host of the recently-retired Video Workbench YouTube channel) compiles a terrific series of articles he originally wrote for the now-defunct Sci-Fi and Fantasy Modeller magazine.
The book’s flagship feature kicks things off with a massive 80-plus page build article on Jason’s fantastic Star Wars vignette, These ARE the Droids You’re Looking For.
The seven articles that follow it cover a terrific range of sci-fi and fantasy modelling, including building and painting figures, making bases, building resin kits, and doing your own resin casting.
So until midnight Monday, you can grab a copy of this great title for just $15 Australian dollars! Now that’s a bargain.
Building Large Scale Sci-Fi & Fantasy Models
In this 473-page eBook, Jason Gares compiles a terrific series of articles he originally wrote for the now-defunct Sci-Fi and Fantasy Modeller magazine.
The book’s flagship feature kicks things off with a massive 80-plus page build article on Jason’s fantastic Star Wars vignette, These ARE the Droids You’re Looking For.
The seven articles that follow it cover a terrific range of sci-fi and fantasy modelling, including building and painting figures, making bases, building resin kits, and doing your own resin casting.
It’s been a while since our last update on this build, and sadly, things have been moving rather slowly. I think as modellers we share a tendency to start finding other things to do when a build starts getting tricky, or when it gets to those bits that we just don’t enjoy doing. In the case of this build, I was stalled on needing to create masks for the chequered nose, and baulking at having to deal with the vacuform canopy. So I built a Bandai Snowspeeder instead!
But I’m pleased to report that I’ve finally made enough progress to be worth posting about, so let’s take a look at what I have done. The main focus of my recent efforts has been the propeller, and more specifically, the spinner. The aircraft that I’ve elected to depict, “Butch Baby” of the 357th Fighter Group (44-14798), features a red-and-yellow chequered nose band with a spinner striped in the same colours:
Decals for this aircraft are supplied in Hasegawa’s 1992 boxing of the kit (ST5), but I decided that I’d prefer to paint as many of the markings as possible, with decals being limited to the aircraft name (which I didn’t feel I could replicate neatly with masks), and the occasional airframe stencil. My plan was to take a high-resolution scan of the kit decal sheet, and then using the trace function built into the Silhouette Studio software, produce a cut file that I could send to my Silhouette Portrait cutter to produce a set of vinyl masks. In practise it turned out to be slightly more complicated than that, but we’ll get to that shortly!
In any case, there were no decals for the spinner stripes to scan, so I knew I’d have to do this the old-fashioned way. I started with the easy bit, which was to paint the entire spinner yellow, using Tamiya XF-3 Flat Yellow. But then I had a fancy idea. And that’s where things went a bit wrong!
I thought I’d experiment with a technique I’d used successfully in the past for scribing spinners and other conical objects. This involves taking a blade or scribing tool, and ‘mounting’ it horizontally on some flexible putty (such as Silly Putty, for example), in such a way that the sharp end of the tool meets the part where you want the line. I figured this could work for cutting the central band out of a masked-up canopy too!
Here’s the general arrangement I came up with:
The balsa sheet is to accommodate the central tube moulded into the back of the spinner that protrudes beyond the backplate:
The idea is to simply rotate the spinner against the blade at the required height—starting with the higher of the two cuts—then press the blade handle into the soft putty until you reach the required lower height, and repeat. Using that process gave me this:
Now, you’ve probably already figured out that this didn’t go as well as I had hoped, but it really wasn’t a complete disaster. After applying the red and unmasking, I arrived at this result:
Hmm, not really what I was going for! I did learn some lessons, though, and I’m sure on a repeat try, I would have achieved a much better result. For starters, the knife/putty combination really needed to be on the balsa sheet with the spinner, as I struggled to stop the balsa square from rotating away from the blade. Consequently, I ended up applying the blade force inconsistently, resulting in some areas of tape not cutting properly, while in other areas I actually cut into the spinner.
Overall, though, I concluded this method a fail, and decided to try another approach: one that I’d used before on smaller parts, but not for a multi-coloured object like this spinner. So I stripped it all back to bare plastic by leaving it in a jar of Windex overnight, cleaned up the wounds, and started again.
First, a fresh coat of yellow, this time using SMS RLM04:
This second method involved using a circle template to form the demarcation points, and backfilling the remaining areas with masking putty.
Unfortunately I didn’t have enough hands to snap a photo of the mask in action, but I can at least report complete success:
The red is SMS Red. I did have to touch up a couple of areas, but that was no big deal. Phew!
But of course, I still had to do the prop blades, which were the source of yet more modelling angst. The basic paint job was easy enough: paint the tips yellow (SMS RLM04 again), mask them off, and then paint the rest of the blades black:
The problems came once I’d applied the kit stencil decals. Thick and shiny, I just couldn’t hide the carrier film, despite multiple gloss coats, sanding the edges, and a flat coat:
The blade top right in this photo really shows the thick and shiny carrier film, despite doing “all the right things” to eliminate it.
I could see straight away that the problem wasn’t traditional ‘silvering’: that horrible problem caused by are becoming trapped under the decal. I really had no choice but to repeat my previous treatment process, but with one important change; this time, instead of using a sanding sponge to reduce the thick edges of the carrier film, I used a stiff sanding board of a very mild grit, so that the sanding surface wouldn’t make allowances for the said edge like I suspect the sponge did.
So, some judicious sanding and some heavy gloss coats later, I was pretty convinced I’d solved the problem:
Hmm, shiny!
And the final flat coat to seal the deal, as they say:
Not perfect, but much improved, and certainly good enough for gubment work.
And I think that’s about it for this update! Next time, we’ll take a look at how I get on with the nose chequers, the vacuform windscreen, and the process of painting on the markings.
I’m pleased to report that Pete Fleischmann‘s Building the Kitty Hawk HH-60G Pave Hawk in 1/35 Scale has just reached the first draft stage! While this makes it sound like we’re at some kind of arbitrary halfway point, in reality the refinement process doesn’t take long at all, and the book should be available by the end of the month at the very latest.
Stay tuned for more updates and an official release announcement as they come to hand:
You must be logged in to post a comment.